Running a simulation
When running a simulation, the solver relies on specific assumptions and automated processes to ensure accurate and efficient results.
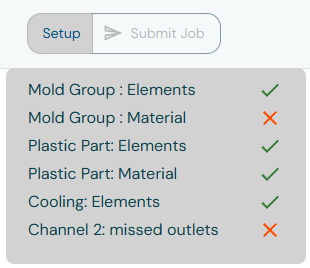
Submitting a job
You can start the solving process after categorizing model components and defining materials by submitting your job.
When the model setup is incomplete, the Submit Job button is unavailable. Hover over it to display a check list of required items that you must define before solving the model.
The following status indicators are displayed:
 Component is correctly defined.
 Component is missing a required definition.
Overview of the simulation process
The solver performs a transient thermal simulation to track temperature changes in the plastic parts, mold, and cooling channels until plastic solidification occurs.
The process involves the following steps:
- Automated meshing
- The solver generates a voxel-based mesh on a cloud-hosted GPU machine. It refines the mesh in areas that require higher detail to capture physical phenomena accurately.
- Temperature initialization
- The solver sets the initial temperature distribution across all mold components depending on the categorization and specified materials.
- Start-up cycles
- The solver runs multiple cycles to simulate the start-up period. The final temperature distribution from these cycles serves as the starting point for the main simulation.
The solver uses the specified inlet water temperature for the cooling channels to calculate the water temperature increase through the cooling system.
The solver calculates heat flow and temperature distribution based on the thermal properties of the mold and plastic materials, including thermal capacity and thermal conductivity. It sets the initial temperature based on the selected plastic material, ensuring accurate modeling of heat transfer and cooling behavior during the simulation.
The solver considers that the plastic is safe to eject when 20% of the local part thickness falls below the safe ejection temperature. This point is referred to as the local freeze time. Simulations run until 99% to 99.5% of the plastic is safe to eject. The simulation continues beyond this point if the expected cooling time you defined is greater.